
T:400-6130-885
E: cservice@xx.com
E: cservice@xx.com
5thfloor, Financial Innovation Plaza, 8-2 Pusi Road, Jiangbei New District, Nanjing
Friendly link (QQ: 3004257586)
Friendly link (QQ: 3004257586)
Views: 0 Author: Site Editor Publish Time: 2026-07-15 Origin: Site
A tumble dryer failing to stay shut creates a hard stop for household laundry routines. If the door refuses to secure, the machine's safety switch cannot engage, meaning the drying cycle will never start. While many people immediately assume they need a new tumble door lock latch, jumping straight to replacement without proper diagnosis often wastes time. Misidentifying the root cause leads to purchasing unreturnable components while your wet clothes sit waiting. This guide breaks down exactly how to verify a latch failure accurately. We will help you evaluate your replacement options objectively to ensure maximum durability. You will also learn how to execute a safe, step-by-step repair right in your own laundry room. Follow these practical steps to restore your appliance to full working order quickly, safely, and without unnecessary frustration.
Replacing parts before isolating the true failure point leads to frustration. You might experience extended equipment downtime. Worse, you might spend money on parts you cannot return. Appliance repair experts strongly advise a systematic diagnosis first. You must treat the machine logically.
Throwing parts at a broken appliance drains your wallet. You lose valuable time waiting for shipping. You also risk causing secondary damage during unnecessary disassembly. Properly identifying the exact broken piece solves these problems. You isolate the failure directly. This keeps repair budgets tight and reduces laundry delays.
Start your diagnosis with a thorough visual inspection. Grab a bright flashlight. Look closely at the door mechanism. You are searching for obvious physical damage. Dryer parts undergo severe temperature swings. Heat cycles make plastics brittle over time. Eventually, they snap.
Check the plastic prongs on both the male strike and the female latch. Look for missing pieces. Notice any severe bending or heavy wear on the leading edges. Sometimes the damage is microscopic. Run your finger over the plastic hook. It should feel sharp and defined, not rounded off.
Next, inspect the cavity inside the latch mechanism. Wet lint often packs tightly into this tiny space. It dries into a hard, cement-like blockage. This debris prevents the moving parts from engaging properly. Use a toothpick to clear out any visible obstruction. Test the door again before ordering parts.
Sometimes the latch functions perfectly, but the door sits crooked. Perform the "drop test" to check alignment. Simply lift slightly on the dryer door handle while pushing it closed. Does it latch securely only when you lift it? If so, the issue is not a faulty tumble door lock latch. Instead, you have a worn hinge. Worn hinges cause door misalignment. The latch simply cannot reach the strike peg.
You must understand the mechanical difference between these two parts. The latch mechanism holds the internal spring tension. It usually sits inside the inner door panel. It is the active component. The catch, or strike, is the static peg. It mounts directly onto the machine frame. Determine exactly which component is broken. Does the spring feel dead? The latch failed. Is the static peg missing? The catch failed.
| Diagnostic Symptom | Likely Component Failure | Required Action |
|---|---|---|
| Door falls open mid-cycle | Weak Latch Spring | Replace Latch Assembly |
| Door bounces back when pushed | Bent Strike/Catch | Replace Strike Peg |
| Door only latches if lifted vertically | Worn Door Hinges | Replace Door Hinges |
| Door feels spongy upon closing | Gasket Obstruction | Reseat Rubber Seal |
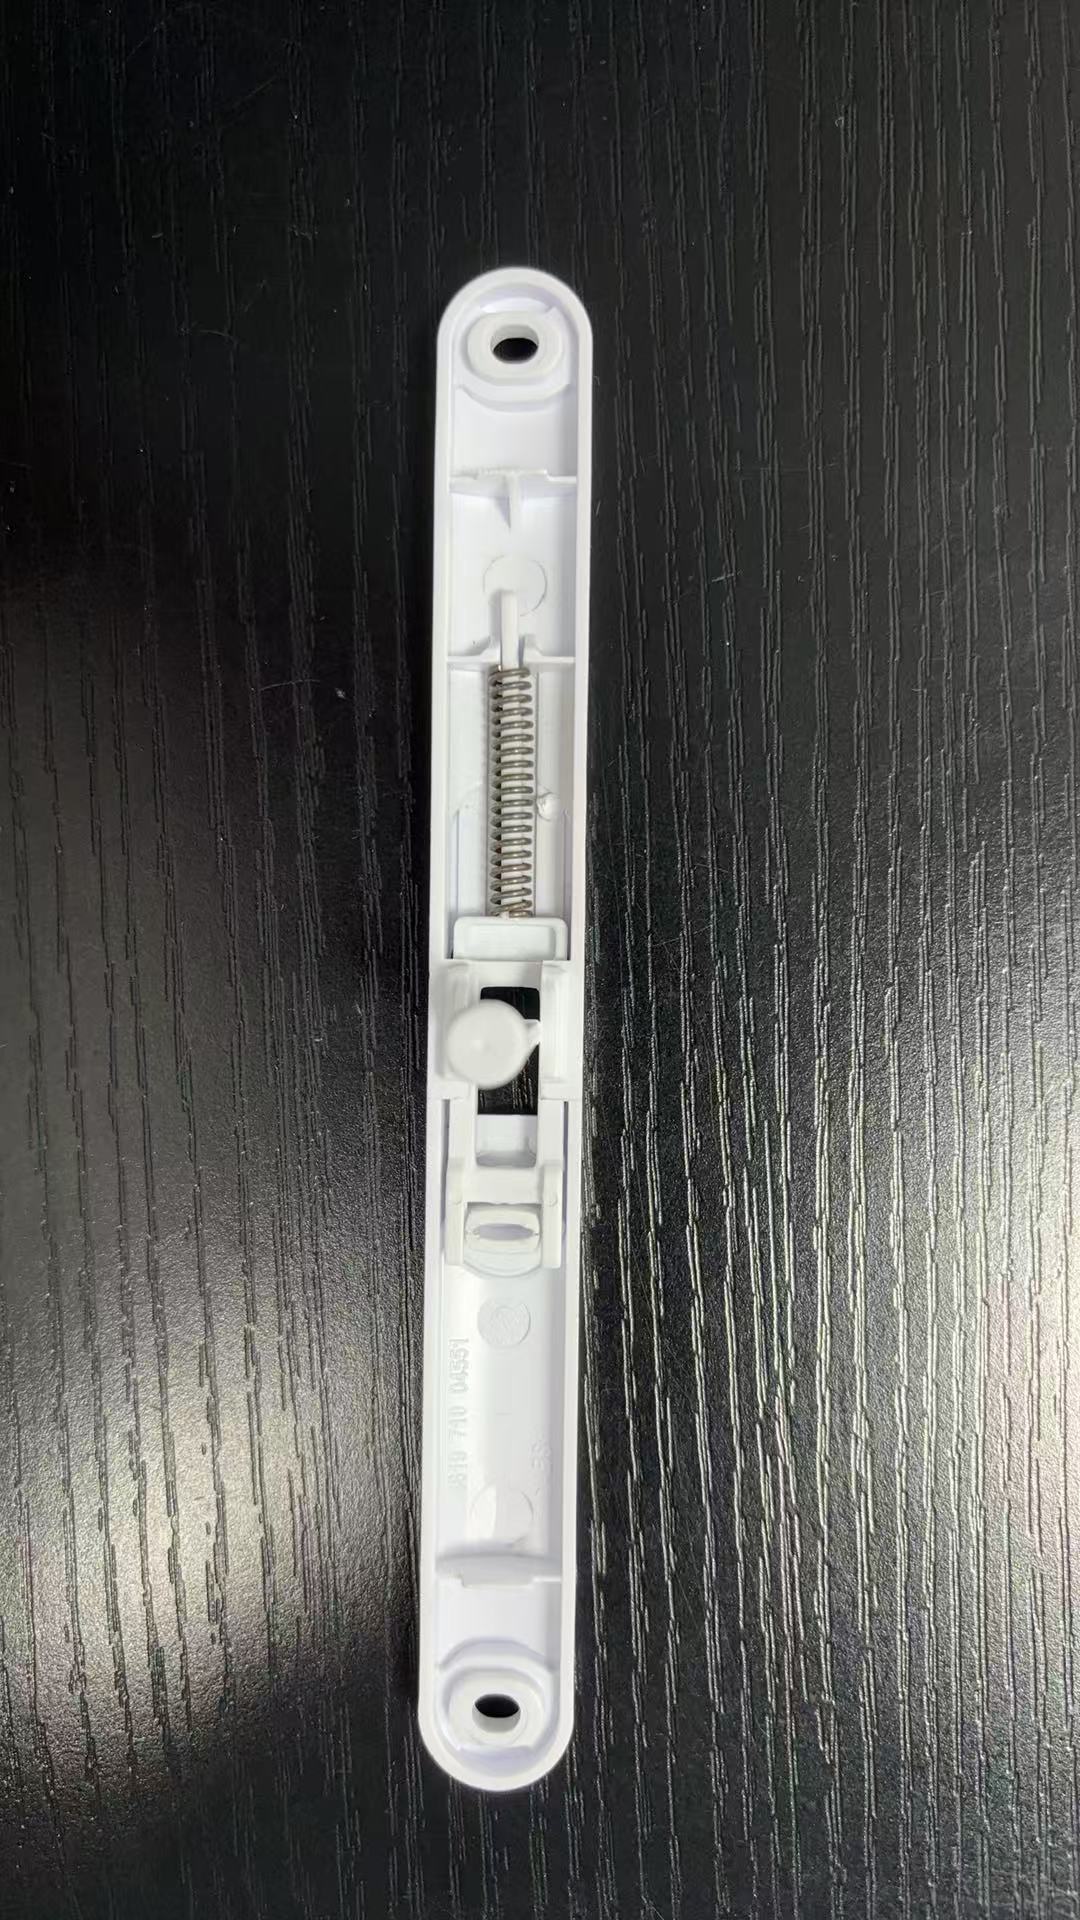
You need to evaluate durability, cost, and warranty protection. Finding the correct part ensures a successful repair. You will face a choice between OEM parts and generic alternatives. Making the right choice matters for long-term reliability.
Every replacement part carries inherent trade-offs. You must weigh the initial purchase price against the expected lifespan. You also need to consider your appliance's current age. A brand-new dryer deserves premium parts. A ten-year-old dryer might only need a temporary, budget-friendly fix.
Original Equipment Manufacturer parts come directly from the dryer's brand. They match the original factory specifications perfectly.
Third-party companies manufacture aftermarket parts. They design them to fit multiple machine brands loosely.
| Feature Comparison | OEM Replacements | Generic/Aftermarket Replacements |
|---|---|---|
| Material Durability | High (Heat-rated engineering polymers) | Variable (Often standard consumer plastics) |
| Fit Precision | Exact match guaranteed | Micro-millimeter variations possible |
| Initial Purchase Price | Higher standard pricing | Highly budget-friendly |
| Warranty Retention | Maintains factory warranty | May void manufacturer support |
Always use precise logic when shopping. Search strictly using your dryer's specific model number. You can find this alphanumeric code easily. Open the door and check the inside rim. Sometimes manufacturers place the sticker on the back panel. Never buy a part based purely on a website photograph. Visual appearances deceive buyers constantly. A part might look identical but feature reverse mounting clips.
Repairing home appliances involves several implementation risks. You must prepare your workspace properly. Rushing into disassembly causes costly mistakes.
You face significant electrical shock hazards. Dryers operate on high-voltage circuits. You could also accidentally scratch the appliance's exterior enamel finish. Careless prying snaps delicate plastic retaining clips. You want to fix the machine, not create more broken pieces.
Safety must always dictate your workflow. Mandatory disconnection from the power supply is your absolute first step. Never skip this. Unplug the dryer entirely from the wall outlet. Gas dryers also require electrical disconnection. If your electric dryer is hardwired, locate your home circuit breaker. Flip the dedicated dual-pole breaker to the off position. Verify the power is dead before touching any metal panels.
Gather your equipment before removing any screws. Having everything within reach prevents frustration. You do not want to hold a heavy door while searching for a screwdriver.
Follow this methodical process to swap the part successfully. Take your time to avoid damaging delicate internal components. Working systematically guarantees a solid repair.
Start by opening the dryer door completely. Some users prefer removing the entire door from the hinges for easier access. If you leave the door attached, support it from below. Locate the inner door panel screws. Remove these perimeter screws carefully. This action exposes the internal latch housing.
Pro Tip: Photograph the orientation of the original latch assembly before removal. Zoom in closely on the spring mechanism. This simple photo ensures correct positioning during reassembly. It saves you from guessing which side faces upward.
Look closely at the back of the broken piece. Locate the small retaining clips holding the old component in the metal bracket. Guide a flathead screwdriver or your pliers to these clips. Depress the tabs gently inward. Push the old latch out from the back side toward the front. We warn strongly against using excessive force here. Heavy prying will permanently warp the sheet metal housing. A warped housing will never hold a new part tightly.
Take your newly purchased tumble door lock latch and examine its tabs. Align it squarely with the rectangular opening in the metal bracket. Press it firmly straight in. Do not push it at an angle. Listen closely for a distinct, sharp audible "click." This satisfying sound confirms the plastic retaining clips are fully seated. Give the part a gentle tug to verify it locks securely into place.
Bring the inner and outer door panels back together carefully. Realign them perfectly before inserting any hardware. Insert the screws by hand first. Turn them backward half a rotation until you feel a slight click. This prevents cross-threading in the plastic posts. Tighten the screws evenly in a star pattern, just like changing a car tire. Do not overtighten, or you will crack the panel.
Perform a manual close test before restoring electricity. Swing the door shut firmly. The strike should enter the latch smoothly. You should feel appropriate tension holding the door closed. Pull it open. It should release cleanly without binding.
Sometimes a brand-new component does not solve the problem. This post-implementation scenario causes immense frustration. You must look beyond the locking mechanism itself. Other structural issues often mimic a broken spring.
Examine the door hinges carefully. Overloading the dryer drum regularly causes extreme hinge fatigue. Leaning heavy wet laundry on the open door causes identical damage. When hinges bend slightly, the entire door drops. The new latch simply cannot align vertically with the strike plate. Lift the end of the open door gently. If you feel excessive vertical play, you need new hinges.
Inspect the rubber gasket bordering the drum. A loose rubber seal pushes heavily back against the door. Twisted gaskets create a stubborn physical barrier. This resistance overrides the holding power of your new latch. Run your fingers along the entire seal perimeter. Look for bunched sections. Reseat any rubber portions pulling away from the metal frame. You can perform the "dollar bill test." Close the door on a dollar bill. If the bill slides out easily without resistance, the seal alignment is poor.
Severe heat exposure occasionally deforms the main dryer frame. Physical impacts cause similar structural problems. Dropping a loaded laundry basket against the front panel dents the metal. These structural changes pull the static catch completely out of alignment. If the front bulkhead is bent inward, the door will never close securely. You can check this by placing a straight edge across the front panel. Significant gaps indicate panel warpage.
Repairing a dryer door requires a logical, step-by-step decision path. You must start with an accurate visual diagnosis of the failure point. Next, you need to acquire the correct replacement part based strictly on your model number. Finally, you execute a methodical replacement process using proper safety protocols.
We recommend observing the complete door system during any repair. Check the hinge alignment carefully. Ensure the rubber seal sits completely flush against the frame. Take your time tightening screws to avoid thread damage.
If you install a premium OEM latch, confirm your hinges are straight, and the door still opens mid-cycle, you should stop your DIY efforts. It is time to consult a certified appliance repair technician. A professional can properly assess severe structural frame damage. They can also test for internal electronic safety switch failures that mimic physical door problems. Addressing these complex issues early prevents further appliance degradation.
A: We strongly advise against using tape, bungee cords, or heavy objects to force the door shut. Bypassing the machine's safety switch presents a severe fire hazard. A dryer runs extremely hot internally. The door must pop open easily to release pressure if a fire starts. Forcing it closed compromises household safety. Wait until you install the correct replacement part.
A: No, they are absolutely not universal. Different appliance brands engineer highly specific tension ratings for their springs. Even if two latches look identical online, the micro-dimensions of the locking prongs vary drastically. A generic latch might fit the metal hole but fail to engage the electronic safety switch. Always buy parts matching your model number.
A: A high-quality OEM replacement should last between five to ten years. Longevity depends heavily on user habits and machine heat cycles. Slamming the door repeatedly cracks the internal plastic housing prematurely. Gently pushing the door closed preserves the spring tension. Good habits maximize the functional lifespan of the new component.


